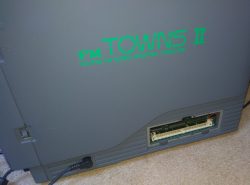
I’m still trying to get my FM Towns in a state to play Wing Commander. It might help if I hadn’t spent so much time playing Truxton 2 on it but I have made some progress this weekend. The main problem I’m having is the lack of information and what there is often conflicting. As such, I thought I’d share what knowledge I do gain starting today with the memory upgrade.
My FM Towns II (like most of the models) comes with 2Mb of RAM. This was quite a lot for the time but that single speed CD-ROM drive just isn’t up to loading data on the fly (as shown in the fairly painful first attempt with Wing Commander a couple of weeks back). I gather some machines support EDO RAM, provided you set the appropriate jumper on the motherboard but I opted for what I hoped was the safe option of buying some 8Mb 70ns FPM, Non-Parity SIMMS from Ebay. Early FM Towns machines are limited to 8Mb SIMM’s as a maximum. I expect that’s not the case with my FM Towns II but 10Mb sounds like plenty for the games I have in mind.
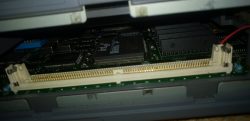
The SIMM’s themselves are cheaply available, more so if you happen to be in the USA. I understand that other FM Towns models vary with many having several slots for SIMM’s but my particular UR model just has the one slot, conveniently located at the side of the case under a plastic flap:-
You can just see the Intex 486SX chip nestling behind the RAM slot. It seems pretty strange these days for a PC CPU to have no heatsink whatsoever but it clearly gets by without. I slotted my RAM in here and of course when I switched the PC on, it wasn’t detected. After much Googling I stumbled on a post at http://nfggames.com/forum2/index.php?topic=6150.0
The upshot is that pins 67-70 on the SIMM chip are used to report the size and speed of the SIMM in question. The IBM compatible chips use a completely different standard to those on the FM Towns so a bit of finagling is required. Fortunately, this is fairly easy to achieve with a soldering iron even for me.

The table above (stolen from the forum post) shows the settings required with O being the pins that should be connected. Most (but not all) SIMM’s will have somewhere on them pairs of solder points for this purpose.
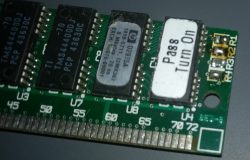
The jumpers in question are at the top right of the chip I’ve used here. R1-R4 represent pins 67-70 in order. R3 was already bridged with a little connector. From the chart above, I also needed to connect R2 and R4. I just filled the gaps with a bit of solder and I’m pleased to report that my FM towns now detected the memory correctly on boot.
I should mention that the first chip I tried still refused to work as it didn’t pass the memory tests at startup. It may well just have been a faulty chip but I’ve heard that some SIMM’s can prove to be incompatible. The one that did work is an HP D2975A which is available on Ebay for under $3.
As far as improving Wing Commander goes, the difference is marked. During cutscenes, the extra memory appears to largely used as a cache, so the first time a given character or scene is shown it is still slow to load but once you have played a mission or two the CD isn’t even accessed most of the time. Gameplay itself is all pre-loaded before the mission and the game is so much more playable now, albeit with a really, really long loading time for that first mission. It’s still quicker than playing Wing Commander 3 on a 486 was.
I’m going to be needing that hard disk if I’m ever going to play Wing Commander 2 as it requires installation to run at all. I have the hard disk but am still waiting on the SCSI cable to try it out. One hitch I know is coming is that the BIOS battery on this thing is long dead and it appears I will have to completely dismantle the machine to get to it. The hard disk will need setting up every time I switch the machine on if I don’t fix this but I might just live with it depending on how much grief it causes. I definitely want to get the hard disk up and running first..
The main thing that is keeping me from a Wing Commander playthrough is that I really don’t much fancy using the keyboard to play the game. The solution to that problem is being delivered next week so providing it works I hope to have this fully up and running before too much longer.


Thanks for this post. It made it pretty easy to understand. I have a FM Towns original model and am looking to upgrade my memory. I noticed most 72 pin SIMMs on Yahoo Auctions Japan already have those jumpers connected. Perhaps it was standard for things like PC-98 and FM Towns (maybe X68000 if it used 72 pin SIMMs, too).
The sizes I see don’t seem to match the expected jumper settings according to that chart above, though. For example, here are a pair of Texas Instrument SIMMs (I am not buying these) that have jumpers A and C bridged, but that combination isn’t listed in the chart.
https://page.auctions.yahoo.co.jp/jp/auction/p709992451
I wonder if different memory manufacturers indicated size differently. The alternative would be that the computers themselves read the SIMMs differently, so the manufacturers had to jumper differently for different computers.
Anyway, if you have any advice before I plunge into buying a set of SIMMs, I’m totally happy to hear it!
I expect it was a standard setup for the RAM on most if not all of those machines in Japan, possibly all PC’s for all I know. I didn’t fancy experimenting given how expensive and slow importing can be. Using old PC RAM from closer to home was much easier and cheaper. There is an FM Towns group on Facebook who might be able to advise, not that I’ve used it myself. I only learned about it long after I got my Towns.
It’s ages since I looked into any of this so I know less than I did. The jumper layout will be different on different RAM brands undoubtedly but what matters in the end is which pins on the SIMM those jumpers relate to as that is what you are trying to change. That part has to be consistent across brands or the RAM wouldn’t work. You’ll need to either follow the traces on the RAM or test this with a multimeter to check which jumper relates to which pin.
Personally, if I was looking for more RAM now, I’d attempt to find the type I used before since I know that works. Assuming I didn’t find it, I’d just get the cheapest appropriate SIMM I could on Ebay and give it a go which is what I did the last time. It worked at the second attempt in my case.
Thanks for the response. I have four sticks of 4MB chips in my watchlist on Yahoo Auctions. It’s not quite as cheap in Japan as it is in the US, I don’t think, looking at about $28, and they’re untested. Here’s to hoping it works!
I also just got a UX20 I’m going to overhaul. Will this RAM work in a UX20 and 20F?
https://www.ebay.com/itm/132160327542
Not sure – I’m hardly expert on this having only learned enough to upgrade my own FM Towns. I do notice that this RAM only has 3 pairs of solder pads for setting the memory size – pin 70 doesn’t have one and would need to be joined for 8MB. This could cause an issue depending on what it defaults to. You could potentially solder on a wire to connect this up if you had to but I’d probably search around a bit more myself.